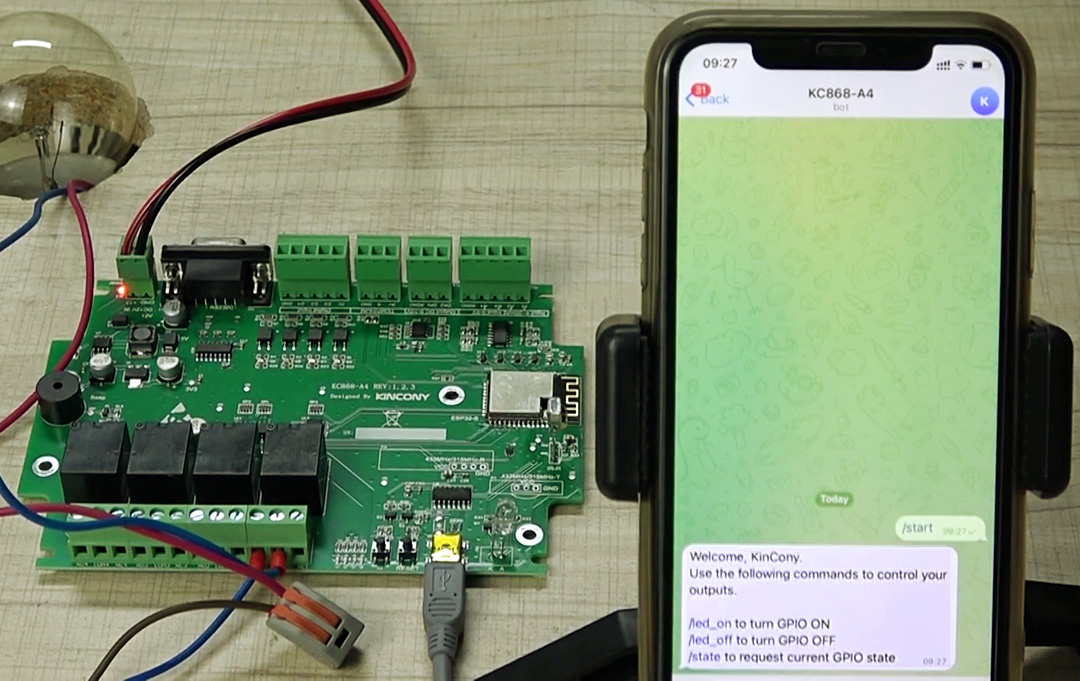
In the previous article (https://habr.com/en/company/ruvds/blog/647119/) of the Kincony KC868-A4 cycle, we examined the “atomic” programming of the components of this controller, in this article we will analyze more advanced examples of working with KC868-A4 – control your (IoT) system via the Internet.
There are many ways to control the controller via the Internet, today we will talk about control using the popular Telegram messenger. If you have Telegram installed on your smartphone, then you can very conveniently receive information messages from your system and give it control commands, wherever you are.
And of course, when you add remote control to the main functionality of your controller, then the capabilities of your system will reach a completely different, higher level.
How is the management via Telegram
For an uninitiated person, such a thing as “managing a controller via Telegram” looks like something not entirely clear, akin to magic. Moreover, the control of the Arduino controller via Telegram – what and how it works there is completely incomprehensible at first glance. In fact, everything is quite simple – the smartphone and the controller exchange information, and Telegram in this scheme acts as an intermediary between them.

Of course, in practice, everything is implemented a little more complicated and there are various nuances in this scheme, but in general it works just like that, and we will talk about the nuances in detail later.
Telegram, as a system, has many features, one of which is the so-called “bots”. A bot is a software robot that can interact with users through the Telegram interface, and in this case we will use such a bot to manage the Kincony KC868-A4 controller.
Conventionally, the above scheme can be represented as follows:

All interaction between Telegram and the controller (Kincony KC868-A4) is hidden from the user, he sees only the reaction of the bot to his actions on the screen of his smartphone. Here is an important point that needs to be well understood: the bot interface is provided by Telegram, but the specific
The “controller” reaction (actions associated with the controller) is provided by the controller itself (in our case, Kincony KC868-A4).
Note. By the way, in the more familiar cases of various (public) bots in Telegram, where we have a controller on the diagram, there are various “adult” computer systems that provide the functionality of these bots.
If you carefully read all of the above, then it should become generally clear to you how such control works through the Telegram messenger (or any other). Now let’s move on to the analysis of the various nuances of the operation of this scheme.
Safety
The interaction between the Telegram service and your smartphone is secure by default
– the developers first of all took care of this, since no one needs a messenger with an insecure connection.
But as for the Telegram-Controller connection, everything is not so simple here – this is interaction
(over the insecure internet) needs to be protected somehow. And here there are two aspects of the problem:

- You need to protect the connection itself. Since we are using a microcontroller, unsecured connections are used by default. To solve this problem, you need to use a special protected version of the client (library).
- We need to identify our controller, so that no one but our controller can control the bot. This problem will be solved by obtaining a token (a special unique code) in Telegram to access our bot.
Next, we will dwell in more detail on the intricacies of ensuring the security of our Telegram bot, and now we are moving from theory to practical actions and we will start by creating a Telegram bot that will control our controller.
Create a Telegram bot
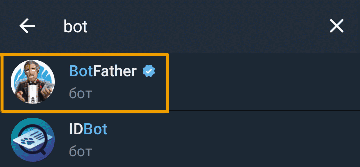
To create a bot to manage our controller, we need to use the services “daddies” of all bots in Telegram (BotFather). To do this, type “bot” in the search bar, find BotFather and select it.
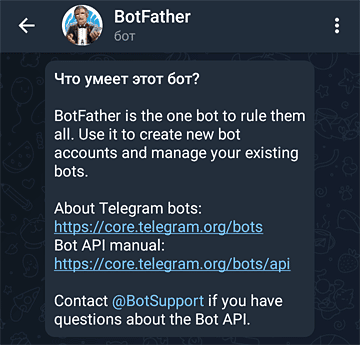
When launched, BotFather offers a little help and links to detailed documentation and feature descriptions.
Now we are not very interested in these details and we simply enter the first command “/start”, to which
BotFather responds with a list of control commands.
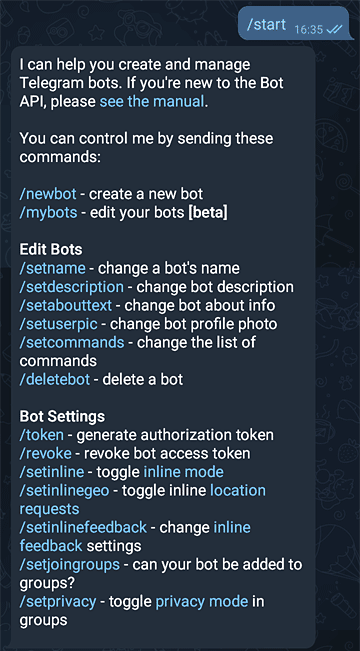
Next, using the BotFather hint, enter the command to create a new bot “/newbot”.

Then, when asked to specify the name of the new bot, we enter the name of the test bot to control our KC868-A4 controller – “a4testbot”.
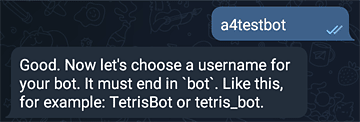
And the last step is to enter the username of the bot and get a unique token to manage it (in the screenshot, the token itself is hidden, for obvious reasons).
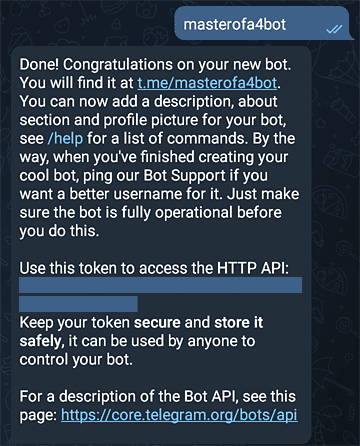
Actually, that’s it, we created a bot to control the Kincony KC868-A4 controller, now it remains only to get your Telegram user ID so that only you can control your controller (and no one else).
Get the user ID
In order to get the Telegram user ID, we need to use another bot – IDBot. We find it similarly to the above method for BotFather and get the following greeting.
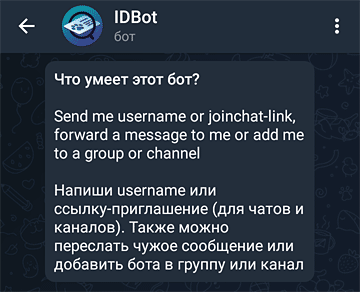
We enter the command “/start” and get your user ID for further use when programming the bot.
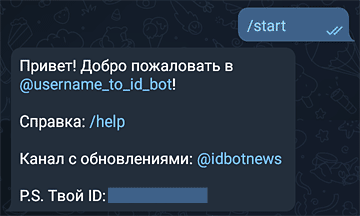
Now everything is really done, and we can proceed directly to programming our Kincony KC868-A4 controller control bot.
Programming
This is already the 3rd article in the cycle about the Kincony KC868-A4 controller and in previous articles we analyzed in detail the setup of the programming environment (Arduino) and considered examples of “atomic” programming of various components of the KC868-A4, therefore, before further reading, we recommend that you familiarize yourself with the previous articles in this cycle Part 1 (https://habr.com/en/company/ruvds/blog/646923/), Part 2 (https://habr.com/en/company/ruvds/blog/599495/) ( if you are not familiar with them).
To work with the Telegram API, we will use the specialized library “Universal-Arduino-Telegram-Bot” (https://github.com/witnessmenow/Universal-Arduino-Telegram-Bot), which will take on the lion’s share of the labor for ensuring the interaction of our code with the Telegram service and will greatly facilitate and simplify the task of programming our bot to control the Kincony KC868-A4 controller.
We will also need the ArduinoJson helper library (https://github.com/bblanchon/ArduinoJson) which contains the necessary functions for working with Json data.
On this, the introductory part on programming can be completed, and then we proceed directly to compiling and analyzing the work of the sketch of our Telegram bot.
Telegram bot sketch
As a test example of controlling the Kincony KC868-A4 controller using the Telegram bot, we will implement the simplest and most intuitive work scenario – turning one of the controller relays on and off with commands in the Telegram interface and requesting the current status of this relay (ON / OFF).
Below is the full code of our Telegram bot, in which you have to change the empty data to your real passwords, tokens, Wi-Fi hotspot names, etc., in order for everything to work. First you need to enter your SSID and Wi-Fi password into the sketch.
const char* ssid = “ssid”;
const char* password = “password”;
Then the token for controlling the bot, the receipt of which we discussed above.
#define BOTtoken “0000000000:AAAAAAAAAAAAAAAAAAAAAAAAAAAAAAAAAAA”
And your Telegram ID, the receipt of which we also considered earlier.
#define CHAT_ID “0000000000”
We also need to make some additional settings in the sketch. We set the pin number of one of the four Kincony KC868-A4 relays (see the diagram and pinout of the controller in previous articles).
const int ledPin = 2;
And the code of our Telegram bot:
The full code of the test example of controlling the Kincony KC868-A4 controller:
/*
Kincony KC868-A4
Telegram example
*/
/*
Rui Santos
Complete project details at https://RandomNerdTutorials.com/telegram-control- esp32-esp8266-nodemcu-outputs/
Project created using Brian Lough’s Universal Telegram Bot Library:
https://github.com/witnessmenow/Universal-Arduino-Telegram-Bot
Example based on the Universal Arduino Telegram Bot Library:
https://github.com/witnessmenow/Universal-Arduino-Telegram- Bot/blob/master/examples/ESP8266/FlashLED/FlashLED.ino
*/
#ifdef ESP32
#include <WiFi.h>
#else
#include <ESP8266WiFi.h>
#endif
#include <WiFiClientSecure.h>
#include <UniversalTelegramBot.h> // Universal Telegram Bot Library written by
Brian Lough: https://github.com/witnessmenow/Universal-Arduino-Telegram-Bot
#include <ArduinoJson.h>
// Replace with your network credentials const char* ssid = “ssid”;
const char* password = “password”;
// Initialize Telegram BOT
#define BOTtoken “0000000000:AAAAAAAAAAAAAAAAAAAAAAAAAAAAAAAAAAA” // your Bot
Token (Get from Botfather)
// Use @myidbot to find out the chat ID of an individual or a group
// Also note that you need to click “start” on a bot before it can
// message you
#define CHAT_ID “0000000000”
#ifdef ESP8266
X509List cert(TELEGRAM_CERTIFICATE_ROOT);
#endif
WiFiClientSecure client; UniversalTelegramBot bot(BOTtoken, client);
// Checks for new messages every 1 second. int botRequestDelay = 1000;
unsigned long lastTimeBotRan;
const int ledPin = 2;
bool ledState = LOW;
// Handle what happens when you receive new messages void handleNewMessages(int numNewMessages) {
Serial.println(“handleNewMessages”); Serial.println(String(numNewMessages));
for (int i=0; i<numNewMessages; i++) {
// Chat id of the requester
String chat_id = String(bot.messages[i].chat_id);
if (chat_id != CHAT_ID){
bot.sendMessage(chat_id, “Unauthorized user”, “”);
continue;
}
// Print the received message
String text = bot.messages[i].text; Serial.println(text);
String from_name = bot.messages[i].from_name;
if (text == “/start”) {
String welcome = “Welcome, ” + from_name + “.\n”;
welcome += “Use the following commands to control your outputs.\n\n”;
welcome += “/led_on to turn GPIO ON \n”;
welcome += “/led_off to turn GPIO OFF \n”;
welcome += “/state to request current GPIO state \n”;
bot.sendMessage(chat_id, welcome, “”);
}
if (text == “/led_on”) {
bot.sendMessage(chat_id, “LED state set to ON”, “”);
ledState = HIGH;
digitalWrite(ledPin, ledState);
}
if (text == “/led_off”) {
bot.sendMessage(chat_id, “LED state set to OFF”, “”);
ledState = LOW;
digitalWrite(ledPin, ledState);
}
if (text == “/state”) {
if (digitalRead(ledPin)){
bot.sendMessage(chat_id, “LED is ON”, “”);
}
else{
bot.sendMessage(chat_id, “LED is OFF”, “”);
}
}
}
}
void setup() { Serial.begin(115200);
#ifdef ESP8266
configTime(0, 0, “pool.ntp.org”); // get UTC time via NTP
client.setTrustAnchors(&cert); // Add root certificate for api.telegram.org
#endif
pinMode(ledPin, OUTPUT);
digitalWrite(ledPin, ledState);
// Connect to Wi-Fi WiFi.mode(WIFI_STA); WiFi.begin(ssid, password);
#ifdef ESP32
client.setCACert(TELEGRAM_CERTIFICATE_ROOT); // Add root certificate for api.telegram.org
#endif
while (WiFi.status() != WL_CONNECTED) {
delay(1000);
Serial.println(“Connecting to WiFi..”);
}
// Print ESP32 Local IP Address
Serial.println(WiFi.localIP());
}
void loop() {
if (millis() > lastTimeBotRan + botRequestDelay) {
int numNewMessages = bot.getUpdates(bot.last_message_received + 1);
while(numNewMessages) { Serial.println(“got response”); handleNewMessages(numNewMessages);
numNewMessages = bot.getUpdates(bot.last_message_received + 1);
}
lastTimeBotRan = millis();
}
}
Now let’s briefly analyze the main parts of this sketch. We will not dwell on the setup() and loop() functions – everything is standard and trivial there – the setup() function initializes and connects to the Wi-Fi network, and the loop() function constantly monitors the receipt of new messages from the Telegram service (from you as a user).
The main functionality of the bot is implemented in the handleNewMessages(int numNewMessages) function, where incoming messages are processed in a loop.
for (int i=0; i<numNewMessages; i++) {
The legitimacy of your connection is checked and unauthorized users (with other IDs) are ignored.
// Chat id of the requester
String chat_id = String(bot.messages[i].chat_id);
if (chat_id != CHAT_ID){
bot.sendMessage(chat_id, “Unauthorized user”, “”);
continue;
}
Next, a welcome message and a hint on the available commands of our bot are displayed.
String from_name = bot.messages[i].from_name;
if (text == “/start”) {
String welcome = “Welcome, ” + from_name + “.\n”;
welcome += “Use the following commands to control your outputs.\n\n”;
welcome += “/led_on to turn GPIO ON \n”;
welcome += “/led_off to turn GPIO OFF \n”;
welcome += “/state to request current GPIO state \n”;
bot.sendMessage(chat_id, welcome, “”);
}
Then the reaction to the relay on/off commands is set.
if (text == “/led_on”) {
bot.sendMessage(chat_id, “LED state set to ON”, “”);
ledState = HIGH;
digitalWrite(ledPin, ledState);
}
if (text == “/led_off”) {
bot.sendMessage(chat_id, “LED state set to OFF”, “”);
ledState = LOW;
digitalWrite(ledPin, ledState);
}
And response to a request for the current status of the relay.
if (text == “/state”) {
if (digitalRead(ledPin)){
bot.sendMessage(chat_id, “LED is ON”, “”);
}
else{
bot.sendMessage(chat_id, “LED is OFF”, “”);
}
}
It is also worth noting that a secure version is used to communicate with the Telegram service.
Wi-Fi client to ensure the security of the bot and controller operation.
#include <WiFiClientSecure.h>
Well, a visual result of the work of our Telegram bot in the form of a screenshot. Pay attention to the last “/state” command, which had no effect – this happens when the Arduino controller is turned off (or unavailable for any reason) – the bot simply stops responding to your commands in the Telegram interface.
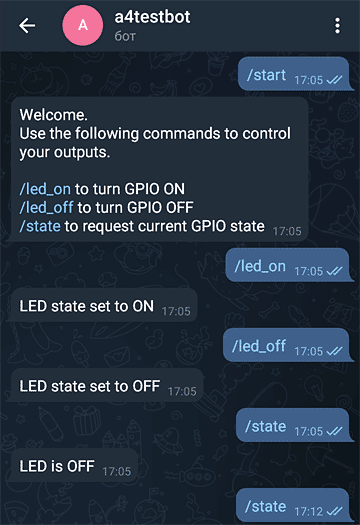
As you can see, thanks to the Universal-Arduino-Telegram-Bot library, creating Arduino bots to control your IoT systems via Telegram turns into an incredibly simple and affordable task – the code is extremely simple and transparent.
This leads to another very positive conclusion: in order to expand the basic functionality of our test bot, you do not need any special knowledge in programming – even a beginner fan of programming and microcontrollers can do this.
Conclusion
In this article, we looked at an advanced example of controlling the Kincony KC868-A4 controller via the Internet using a Telegram bot and found out that it is not difficult at all and is accessible even for novice Arduino lovers.
In the next article, we will finally get to the “heavy artillery” and get acquainted with examples of Kincony KC868-A4 running complex ESP32 firmware like Tasmota, ESPhome or a specialized version of AMS.

